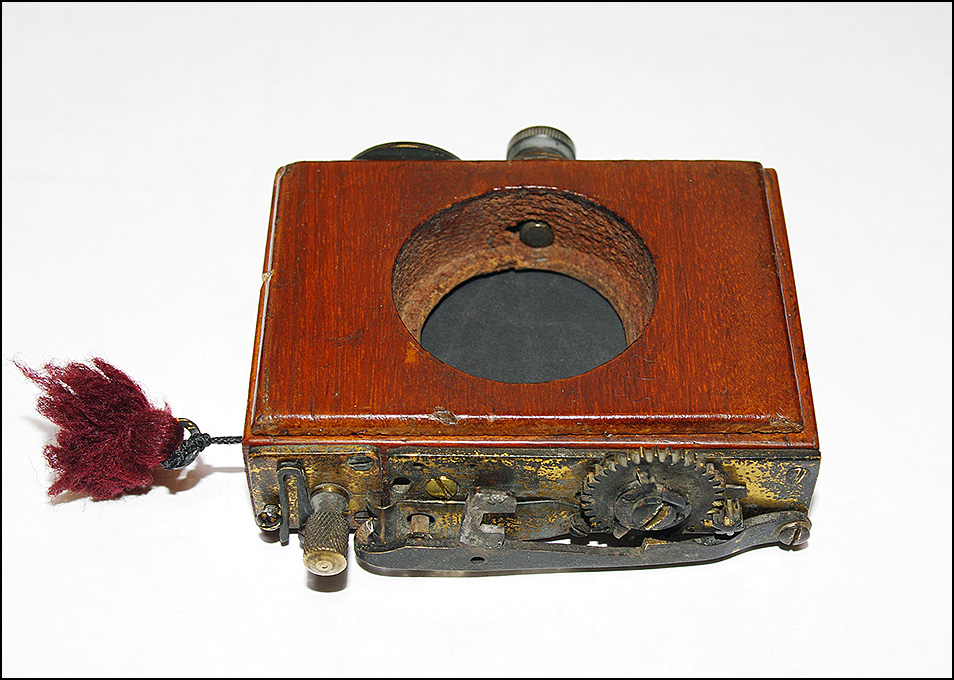
Disassembling the Shutter
Leave the speed dial in place, but remove any other screws or plates on that side.
You can gently clean the dial with water on a Q-tip, but anything stronger will remove the lettering.
On the opposite side, near the bottom of the brass mechanism plate there is a long screw, possibly with the widest head, that goes through to the lens holder. Remove it. You should now be able to lift out the centre wood block that holds the lens.
Remove the long bar. Take out the small screw next to it and the screw in the nearby corner.
Mark the intersecting tooth on the small cog by scraping it with the tip of a jeweller's screwdriver. Scrape the two teeth either side of it on the large cog wheel. You will realign these three teeth when you reassemble the shutter.
Undo the screw on the large cog and lift it off. Slide out the spacer underneath and mark the top side.
There may be one more screw but otherwise you can now lift off the brass mechanism plate.
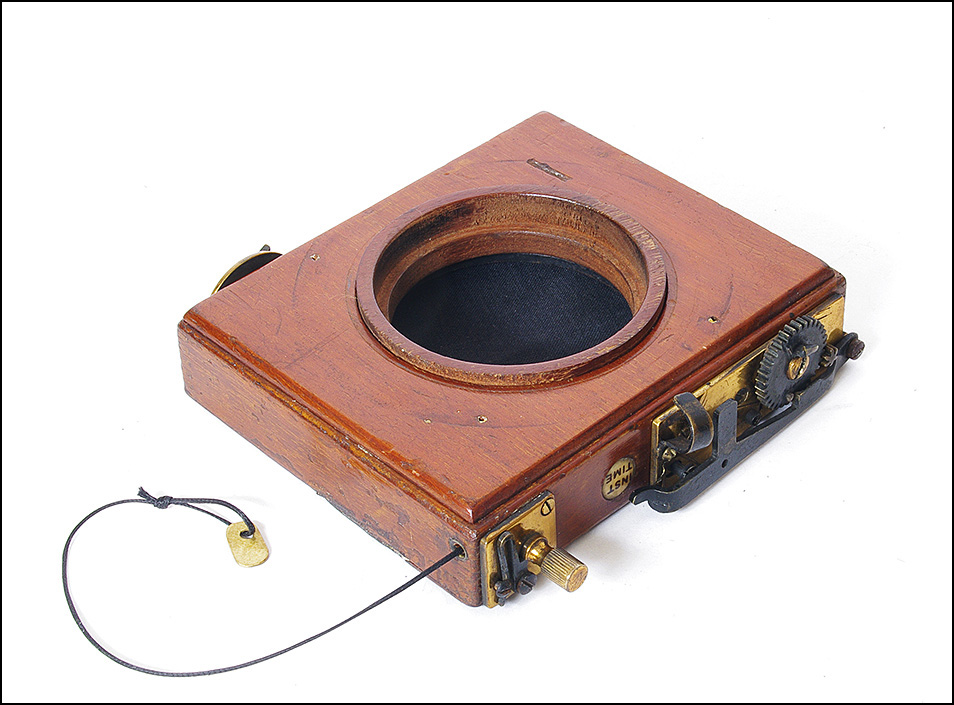
Note how many turns of string there are on the spindle, and the direction of the string, and then maneouver the top roller out of the socket.
The top roller has a thin wooden shaft covering the fabric. Remove this carefully and then separate the brass rod from the fabric.
If you remove the bottom roller you will have the problem of rewinding the spring, but it's not necessary - the curtain can be replaced with the bottom roller left in place.
Mark which end of the curtain is the top (string) and which is the bottom (spring) end. Use a small scraper to remove the fabric from the bottom roller.
Flatten and smooth out the old fabric curtain so you can see its shape, and also clean up any parts of wood or brass that need it. Note how they are arranged and carefully remove the two strips of bamboo/metal and keep them to use again. As far as possible try to avoid damaging the original fabric as you still need it for reference.
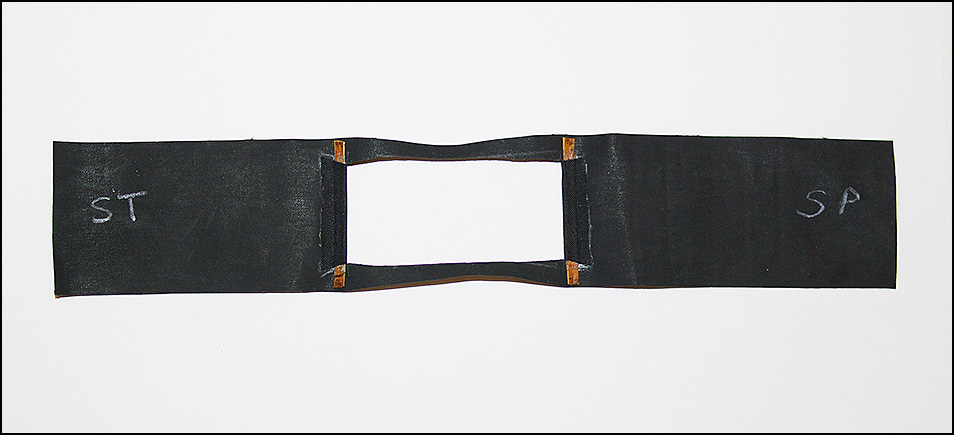
Making a New Curtain
Thorlabs BK5 fabric works very well, but you can make it 100% lightproof by coating the woven side with a matte black acrylic paint.
You need to have the rubberised side of your fabric uppermost and check that the long threads of the weave are parallel to the long side of the curtain you will cut. Ensure that the new fabric is not distorted out of shape and use a metal straight edge to cut it to the same length and width as the old one. You'll see that one end of the old curtain has a different length to the other side.
Check the length of each end and trim the fabric precisely. A French chalk pencil is useful for marking the top and bottom ends. It's also helpful when marking the area for gluing as you will put the glue onto the fabric, not onto the roller itself.
Some people use separate pieces of curtain fabric and join them with two tapes. If your fabric is a strong fine weave you can simply cut a window into the middle section, leaving a ribbon of fabric on either side. Measure out the lines where you will cut for the two ribbon parts. These should be the exact same length as the original window, but not completely straight. The cut should bow inwards near the ends (for strength) so that if the ribbon is 5mm wide along the middle section then at the ends it should be 8mm.
You can now cut the fabric inside the window in half and bend back each side. Place one of the bamboo strips under the flap and pull the fabric taut, making sure that the new window edge is perpendicular to the long side.
You can now estimate how much of the flap you need to either glue down or sew in the bamboo. The old ones were sewn but with modern materials glue may be sufficient. I use Evostik Timebond Contact Adhesive as it makes an excellent bond with the rubber.
Leave between 3mm and 4mm of fabric beyond the bamboo strip, and then cut away what you don't need. Spread the glue evenly to hold the strip and the additional flap. Repeat for the other side and again check that your window is a faithful copy of the old one. The window needs to be the same length in order to maintain the same speed (within 3mm difference is fine). Roll up the strip around something round like a screwdriver. Check that it is rolled evenly and tighten it in place with two elastic bands - this will keep it under tension while the glue dries.
Fitting the Curtain
The spring roller will be in an unwound state, but that's not a problem as it will be retensioned after reassembly. You can turn the bottom roller a little if it helps you to get the fabric under it and over the top.
Spread glue over the fabric at the bottom and slide it under the roller and over. Wrap it on so that the edge meets the fabric and the entire roller is covered - the glued fabric should cover the roller without overlapping. Use a small scraper to add in extra glue if necessary, but equally make sure that any excess spots of glue are cleaned off.
The mating of the fabric to the roller must be a clean straight line just as the length of the fabric curtain must go up and down in a straight line. Wind up the roller to check that the curtain winds on straight. Hold it under tension for a while until it is dry.
With the bottom roller fitted you should look to fitting a new string to the top spindle. It's easier to attach it now before fixing the curtain to the top. I used a thick shoemaker's thread. You have to find the best way to feed it though the hole in the spindle and knot it.
Once the knot is secure you can spread enough glue onto the fabric to go all around the spindle once, without overlapping. Leave about 2mm empty space between the edge of the fabric and the brass spindle. The knot in the string can act as a good spacer. Again check for perpendicularity. Keep the fabric under tension until it is dry.
The balsa wood shaft must now go on. There's no need to glue it, but check that it doesn't force the fabric out of line or push the fabric to the end of the rod. If it does you need to do it again.
Wrap the string around the spindle several times, ensure that it travels through the loop inside the edge of the box, and poke it through the bottom hole. Now insert the top roller into position and pull the string out of the way.
The spring roller is tensioned with the knob on the outside of the case. Undo the pawl next to it. Wiggle it a little to lose any residual tension.
Roll the curtain all the way onto the spring roller. When fully loaded there should be no more than one or two loops of string on the spindle. Adjust the string if needed.
Refit the brass mechanism plate, ensuring that the correct cog teeth are mating as described at the beginning. If the tabs on the large cog and the connector on the long bar are worn you may need to do some adjustment. I fixed one by adding a thin brass washer under the large cog. Take care that the screw holdng the cog is neither too tight nor too loose. Also check that the screw holes in the wood frame are strong enough - if they are loose the tension may draw the brass plate downwards preventing proper firing. If you have difficulty cocking to focus, hold the lever in as you pull the string.
Replace the pawl screw. Wind up the tension knob and try the shutter. If it's working as it should, make a guess as to the speed and then set the pointer on the other side to that speed by undoing the large screw head.
General Use
The claw at the end of the long lever can sit in two positions, left for Time and right for Instant exposures.
On Instant: pull the cord half way to open the shutter for focusing, and then pull it all the way to cock the shutter. Raise the lever slightly to fire it. It may be possible to fit an air bulb cable release under it.
On Time: after pulling the cord to open the shutter, press gently on the lever to close it again.